Shared hosting is slow. Managed WordPress hosting is expensive. Cloudways gives you VPS-level performance at a fraction of the cost, and you can set up WordPress in under 20 minutes.
In this guide, I will show you exactly how to set up WordPress on Cloudways from scratch. No server management experience required.
Start locally with our Local WordPress guide
Table of Contents
What is Cloudways?
URL: cloudways.com
Cloudways is a managed cloud hosting platform. Unlike traditional shared hosting (Bluehost, HostGator), Cloudways runs on top of powerful cloud providers like DigitalOcean, AWS, Google Cloud, and Linode. You get VPS performance without needing to manage the server yourself.
Why Cloudways is different:
- Pay-as-you-go pricing (no annual contracts required)
- Dedicated server resources (no sharing with noisy neighbors)
- Built-in caching (Breeze plugin and Redis)
- Free SSL certificates (auto-renewing)
- Staging environments (test changes before going live)
- 24/7 live chat support (actual humans, not bots)
Pricing: What to Expect
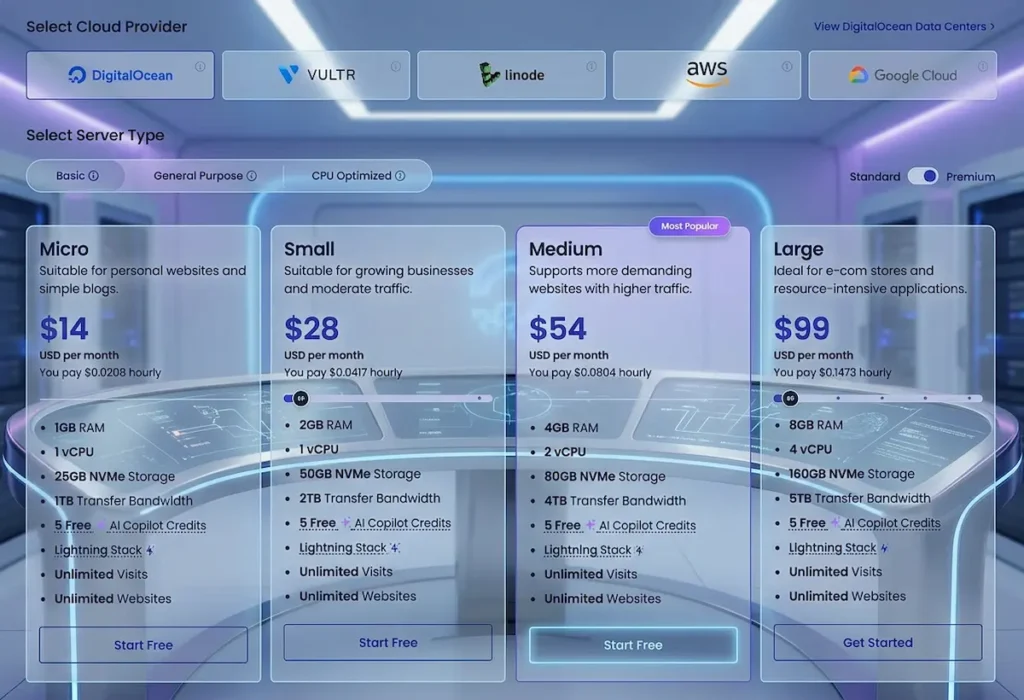
Cloudways offers a 3-day free trial (no credit card required for first 3 days, but you will need to add payment method to continue after trial). After that, prices start at:
- DigitalOcean: $14/month (1GB RAM, 1 vCPU, 25GB storage, 1TB bandwidth)
- Vultr: $14/month (same specs)
- Linode: $14/month (same specs)
- AWS: $20.56/month (higher performance, more expensive)
- Google Cloud: $37.33/month (similar to AWS)
For most new WordPress sites, the $14/month DigitalOcean plan is more than enough.
Step 1: Sign Up for Cloudways Free Trial
1. Go to cloudways.com and click “Start Free Trial”
2. Enter your name, email address, and create a password
3. Cloudways will ask for a credit card to verify identity, but you will not be charged during the 3-day trial. You can cancel before the trial ends at no cost.
4. Verify your email address by clicking the link Cloudways sends you
Step 2: Launch Your Server

1. After logging in, click on “Add Server” or “Launch Server”
2. You will see three options:
- Applications: Choose “WordPress” from the dropdown
- Server Details: Give your server a name (e.g., “my-wordpress-site”)
- Project: Leave as default or create a new project
3. Choose your cloud provider and server size:
- Cloud Provider: Select “DigitalOcean” (best value for beginners)
- Server Size: Select “$14/month – 1GB RAM” (perfect for most new sites)
- Location: Choose a region closest to your target audience
4. Click “Launch Server”
Cloudways will now provision your server. This takes 5-7 minutes. You will see a progress bar. Do not close the browser tab.
Optimize your new Cloudways site for speed
Step 3: Access Your WordPress Admin
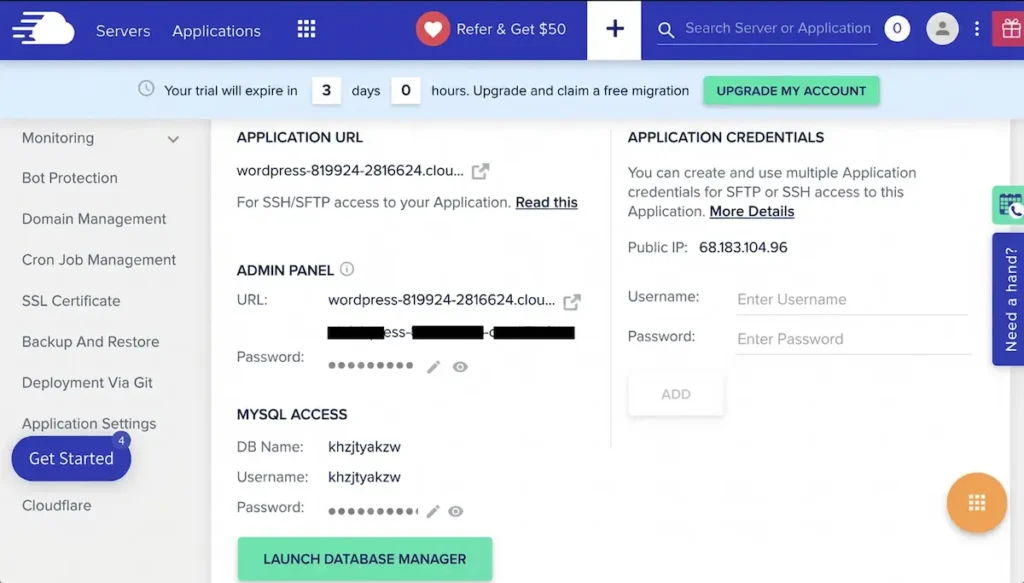
Once the server status shows “Running” (green checkmark):
- Go to “Applications” and click on your WordPress application
- Under “Application Management”, you will see your admin URL, username, and password
- Click the admin URL or copy it to your browser
- Log in with the provided username and password
You are now inside your fresh WordPress dashboard. The default Cloudways WordPress installation includes the Breeze caching plugin pre-installed and configured.
Step 4: Set Up Your Domain Name
By default, Cloudways gives you a temporary domain (something like `your-server-ip.cloudwaysapps.com`). To use your own domain:
- Go to “Applications” → “Application Management” → “Domain Management”
- Enter your domain name (e.g., `webdevtoolkit.com`) and click “Add Domain”
- Go to your domain registrar (Namecheap, Cloudflare, etc.)
- Update your DNS settings to point to the IP address shown in Cloudways
- Add a CNAME record for `www` pointing to your main domain
Step 5: Install Free SSL Certificate
Cloudways provides free SSL certificates through Let’s Encrypt:
- Go to “Applications” → “Application Management” → “SSL Certificate”
- Select “Let’s Encrypt” and enable it
- Check both boxes (www and non-www versions)
- Click “Install”
Wait 1-2 minutes. Your site will now have HTTPS enabled automatically.
Step 6: Set Up a Staging Environment (Highly Recommended)
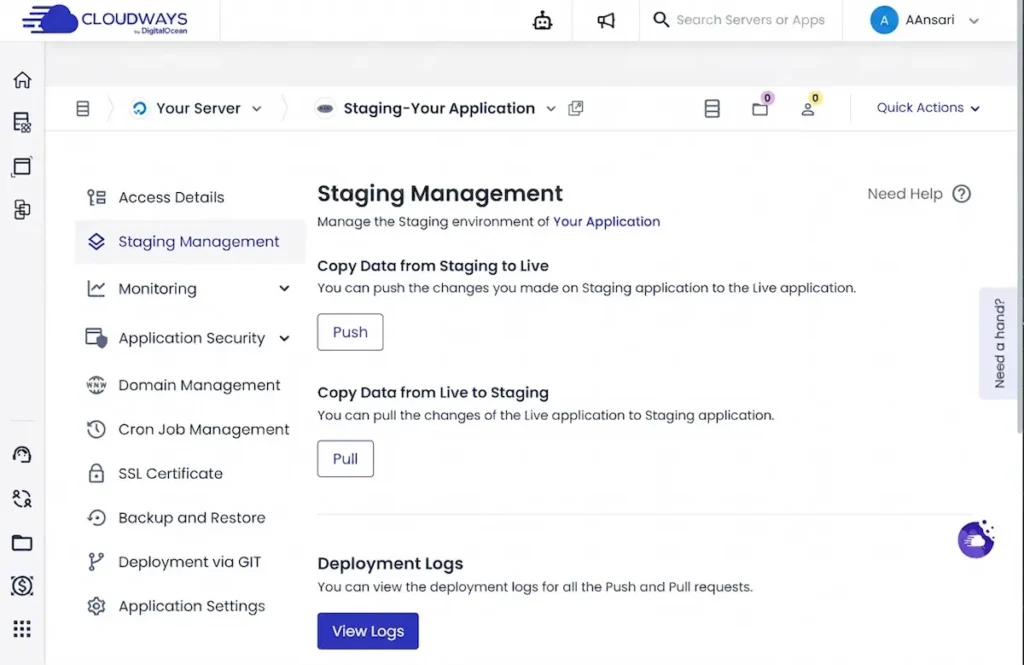
Cloudways lets you create a staging copy of your site with one click. This is where you test theme updates, plugin changes, or new code before affecting your live site.
- Go to “Applications” → “Staging Management”
- Click “Create Staging”
- Wait 2-3 minutes for the copy to complete
- Make changes on your staging site (URL will be `staging.yourdomain.com` or similar)
- When ready, click “Push to Live” to deploy changes
Step 7: Configure Breeze Caching for Speed

Cloudways includes the Breeze caching plugin pre-installed. To enable it:
- In your WordPress dashboard, go to “Plugins”
- Find “Breeze” and make sure it is activated (it should be)
- Go to “Settings” → “Breeze”
- Enable “Cache System” under the Basic Options tab
- Enable “Minification” for CSS and JS files
- Click “Save Changes”
For even better performance, enable Redis caching:
- Go to your Cloudways server management panel
- Click “Services”
- Find “Redis” and click “Install”
- Install the Redis Object Cache plugin in WordPress
- Connect it to your Redis server (Cloudways provides the credentials)
Troubleshooting Common Issues
Issue: My site is loading slowly after setup
Solution: Enable Breeze caching and minification. Also check that Redis is installed and connected. For images, run them through ShortPixel or similar compression tools.
Issue: I forgot my WordPress admin password
Solution: In Cloudways, go to “Applications” → “Application Settings” → “Reset Admin Password”. Cloudways will generate a new password for you.
Issue: My domain is not connecting
Solution: DNS changes take 24-48 hours to fully propagate. Check that you entered the correct IP address. Use a tool like `whatsmydns.net` to see if your domain has resolved.
Issue: I want to upgrade my server size
Solution: Go to “Servers” → “Vertical Scaling”. Choose a larger plan. Cloudways will upgrade your server without downtime. This feature really stands out from almost every other hosting provider.
Cloudways vs. Other Hosting Options
| Hosting Type | Example | Price | Performance | Best For |
|---|---|---|---|---|
| Shared | Bluehost, HostGator | $3-10/month | Slow | Absolute beginners, hobby sites |
| Managed WordPress | WP Engine, Kinsta | $25-35+/month | Excellent | Business sites with budget |
| Cloudways (VPS) | DigitalOcean via Cloudways | $14/month | Excellent | Developers, agencies, growing sites |