You built a React app and deployed it to Netlify. Now you have a random URL like your-app.netlify.app. That works for testing, but a custom domain makes your project look professional and builds trust with visitors.
In this guide, I will show you exactly how to add a custom domain to your Netlify site. Netlify automatically provisions a free SSL certificate, so your site will be secure with HTTPS.
First, deploy your React app to Netlify
Table of Contents
What You Will Need

Before you start, make sure you have:
- A Netlify account (free) with your site already deployed
- A custom domain name (e.g.,
myawesomeapp.com) purchased from a domain registrar like Namecheap, GoDaddy, or Cloudflare - Access to your domain’s DNS settings (your registrar provides this)
Step 1: Add Your Custom Domain in Netlify
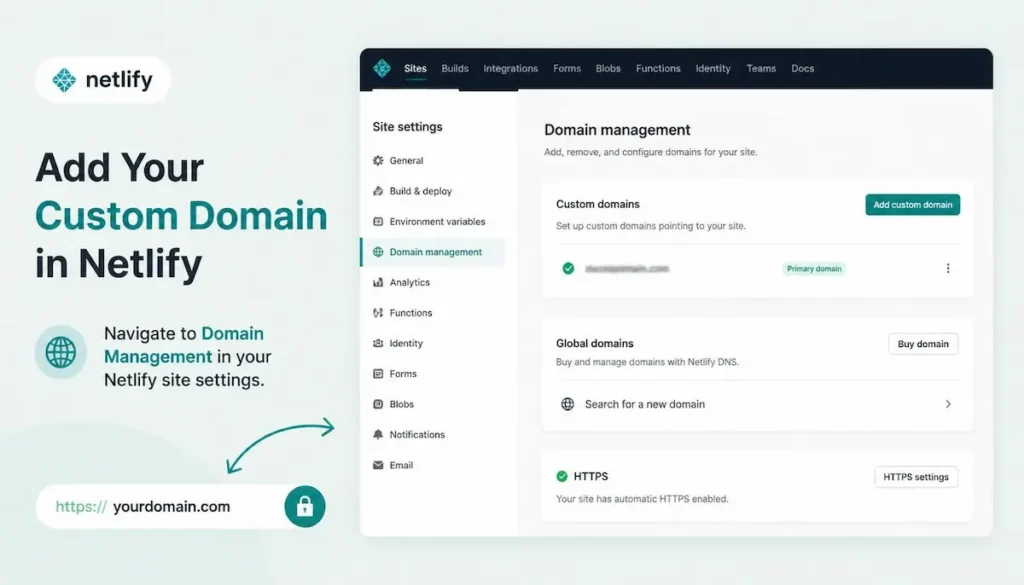
1. Log into your Netlify account at app.netlify.com
2. Select your site from the list of sites
3. Click on “Site settings” (usually a tab at the top)
4. In the left sidebar, click on “Domain management”
5. Under the “Custom domains” section, click “Add custom domain”
6. Enter your custom domain (e.g., myawesomeapp.com) and click “Verify”
7. Click “Yes, add domain” to confirm
Netlify will now add your domain to the site. You will see it listed under “Custom domains” with a pending status. This is normal.
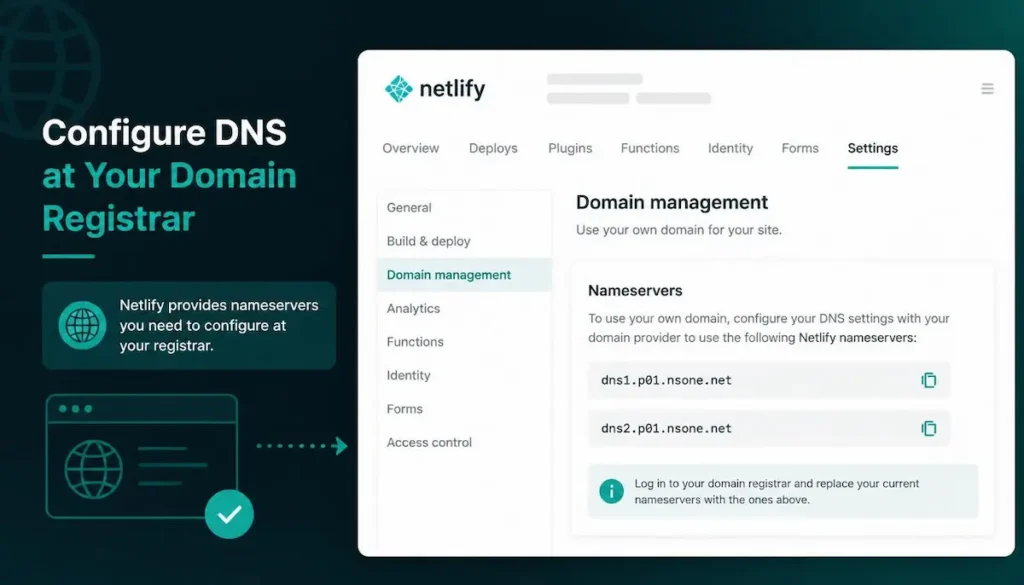
Step 2: Configure DNS at Your Domain Registrar
To point your domain to Netlify, you have two options. Choose the one that works best for you.
Option A: Use Netlify Nameservers (Easiest for Most Users)
1. In Netlify’s Domain management page, look for the section that shows “Netlify DNS” or nameserver information
2. Note down the nameservers provided by Netlify (they look like dns1.p01.nsone.net and similar)
3. Log into your domain registrar account (Namecheap, GoDaddy, etc.)
4. Find the DNS or Nameserver settings for your domain
5. Replace the existing nameservers with the Netlify nameservers
6. Save the changes
Important: DNS changes can take 24-48 hours to fully propagate worldwide. Your site may not work immediately.
Option B: Add an A Record or CNAME (More Control)
If you cannot change nameservers or prefer more control, use DNS records instead:
- For the root domain (example.com): Create an A record pointing to Netlify’s load balancer IP:
75.2.60.5 - For the www subdomain (www.example.com): Create a CNAME record pointing to
your-app-name.netlify.app - Remove any AAAA records: Some registrars add them by default. Remove them to avoid conflicts.
Proper domain setup helps with SEO
Step 3: Verify DNS Configuration in Netlify
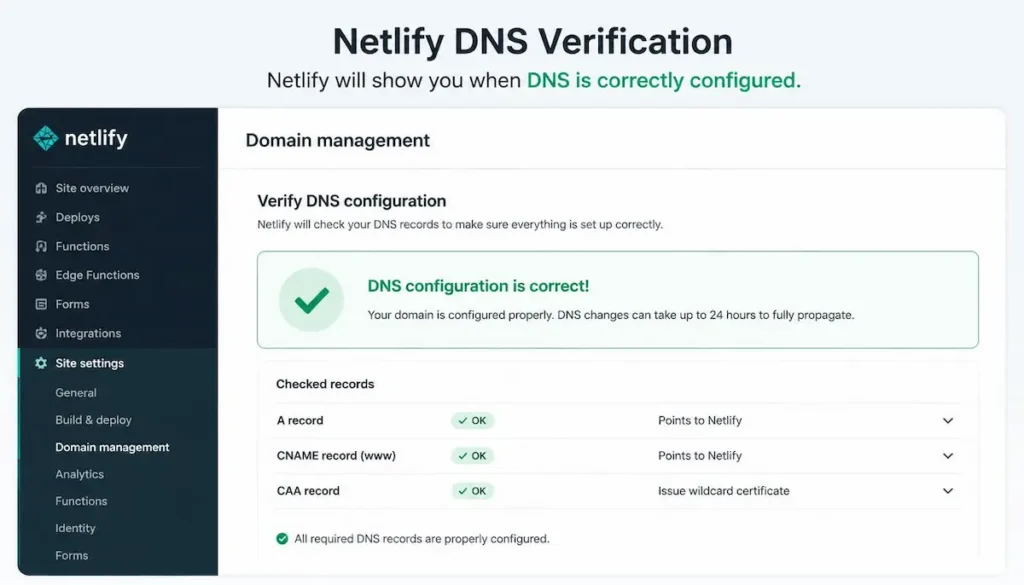
After updating your DNS settings, go back to Netlify’s Domain management page. Netlify will periodically check your DNS configuration.
You will see one of these status messages:
- Pending: DNS changes are still propagating (normal for the first few hours)
- Configured: DNS is correct and your site is accessible via the custom domain
- Misconfigured: Something is wrong. Check your DNS settings against Netlify’s instructions.
You can use Netlify’s “Check DNS configuration” button to run a manual check at any time.
Step 4: Enable Automatic HTTPS (Free SSL)

Netlify automatically provisions a free SSL certificate from Let’s Encrypt for every custom domain. You do not need to buy an SSL certificate separately.
What to expect:
- Once your domain resolves to Netlify, HTTPS is enabled automatically
- The certificate provisioning process can take 5-30 minutes to complete
- You will see a status message in Domain management under “HTTPS”
- Your site will be accessible at
https://yourdomain.comonce ready
If you need to force all traffic to HTTPS, Netlify does this by default. Your site will automatically redirect HTTP to HTTPS.
Step 5: Set Your Primary Domain (WWW vs Non-WWW)
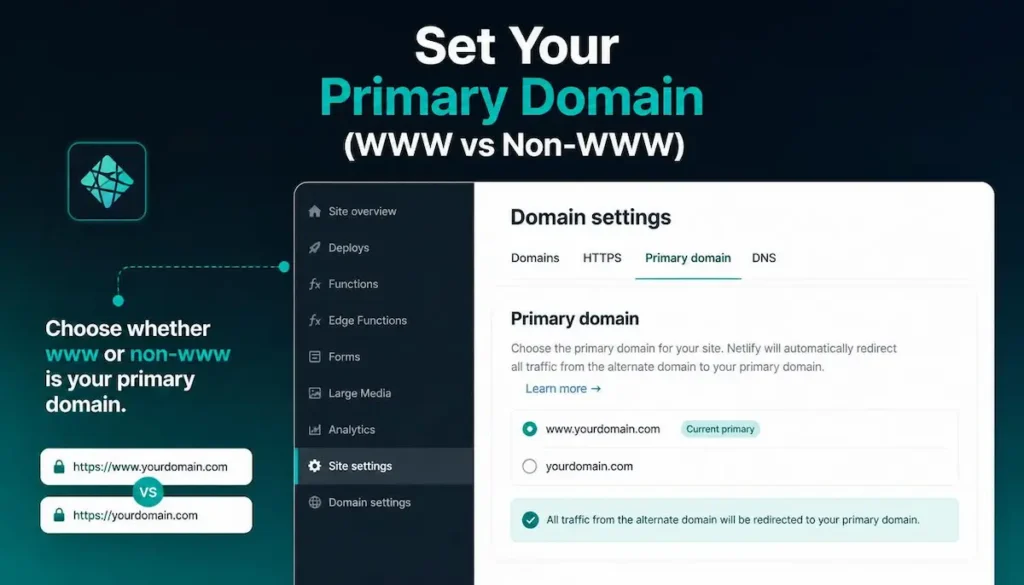
Decide whether you want your site to load with or without the “www” prefix. Most developers prefer non-www (e.g., myawesomeapp.com).
To set your primary domain in Netlify:
- Go to Domain management → Custom domains
- Click the three dots (options menu) next to your domain
- Select “Set as primary domain”
- Choose the version you prefer (with or without www)
Netlify will automatically redirect the other version to your primary domain.
Troubleshooting Common Issues
Issue: “Domain is misconfigured” error in Netlify
Solution: One or more DNS records are incorrect. Double-check that your A record points to 75.2.60.5 and your CNAME points to your-app-name.netlify.app. Also remove any AAAA records your registrar may have added automatically.
Issue: SSL certificate not provisioning
Solution: SSL certificates require DNS to be fully resolved. Wait up to 24 hours after DNS changes. If still not working, click “Renew certificate” in Netlify’s HTTPS settings.
Issue: Your site loads sometimes, sometimes not
Solution: DNS propagation is incomplete. This is normal for the first 24-48 hours after changing nameservers or DNS records. The issue will resolve itself when propagation finishes worldwide.
Issue: Cannot change nameservers at your registrar
Solution: Some registrators lock nameserver changes. Contact their support for assistance. Alternatively, use Option B (A record and CNAME) instead of nameserver changes.
Netlify vs Other Hosting for Custom Domains
| Feature | Netlify | Vercel | GitHub Pages |
|---|---|---|---|
| Custom domain support | ✅ Yes | ✅ Yes | ✅ Yes |
| Free SSL certificate | ✅ Automatic | ✅ Automatic | ✅ Automatic |
| DNS management in dashboard | ✅ Yes (Netlify DNS) | ✅ Yes | ❌ No |
| Ease of setup for beginners | ✅ Very easy | ✅ Very easy | ⚠️ Manual DNS setup needed |
| Automatic redirects (WWW to non-WWW) | ✅ Yes | ✅ Yes | ⚠️ Manual configuration required |
Build something with these APIs for your domain
Final Thoughts
Adding a custom domain to Netlify takes less than 10 minutes of active work. The rest is waiting for DNS propagation. The free SSL certificate from Let’s Encrypt is automatically provisioned, so your site will be secure without any extra cost.
The most common mistake is not waiting long enough for DNS changes to propagate. If your site does not load immediately, wait a few hours and check again. The “Check DNS configuration” button in Netlify is your best friend for troubleshooting.
Have you added a custom domain to Netlify before? What challenges did you face? Let me know in the comments below.
✍️ Want to Contribute?
WebDevToolkit accepts high-quality guest posts from web developers, SEO professionals, and digital marketers.
✅ Do-follow backlink included
✅ Published within 5 days
✅ Shared with 1,000+ monthly readers